Use CueStride with OBS Studio
Add the CueStride Timer to an OBS Studio scene step by step, then remove its black background with a blend mode, a color key, or a transparent link.
Last checked against CueStride on 29 October 2026.
OBS Studio can show any web page in a scene as a browser source. Give it the link of a room’s Timer and the countdown, its wrap-up colours, and the messages you send appear in your stream or recording, in step with the screens on stage. This guide adds the Timer to a scene step by step, then gives three ways to lay it over your video without its black background.
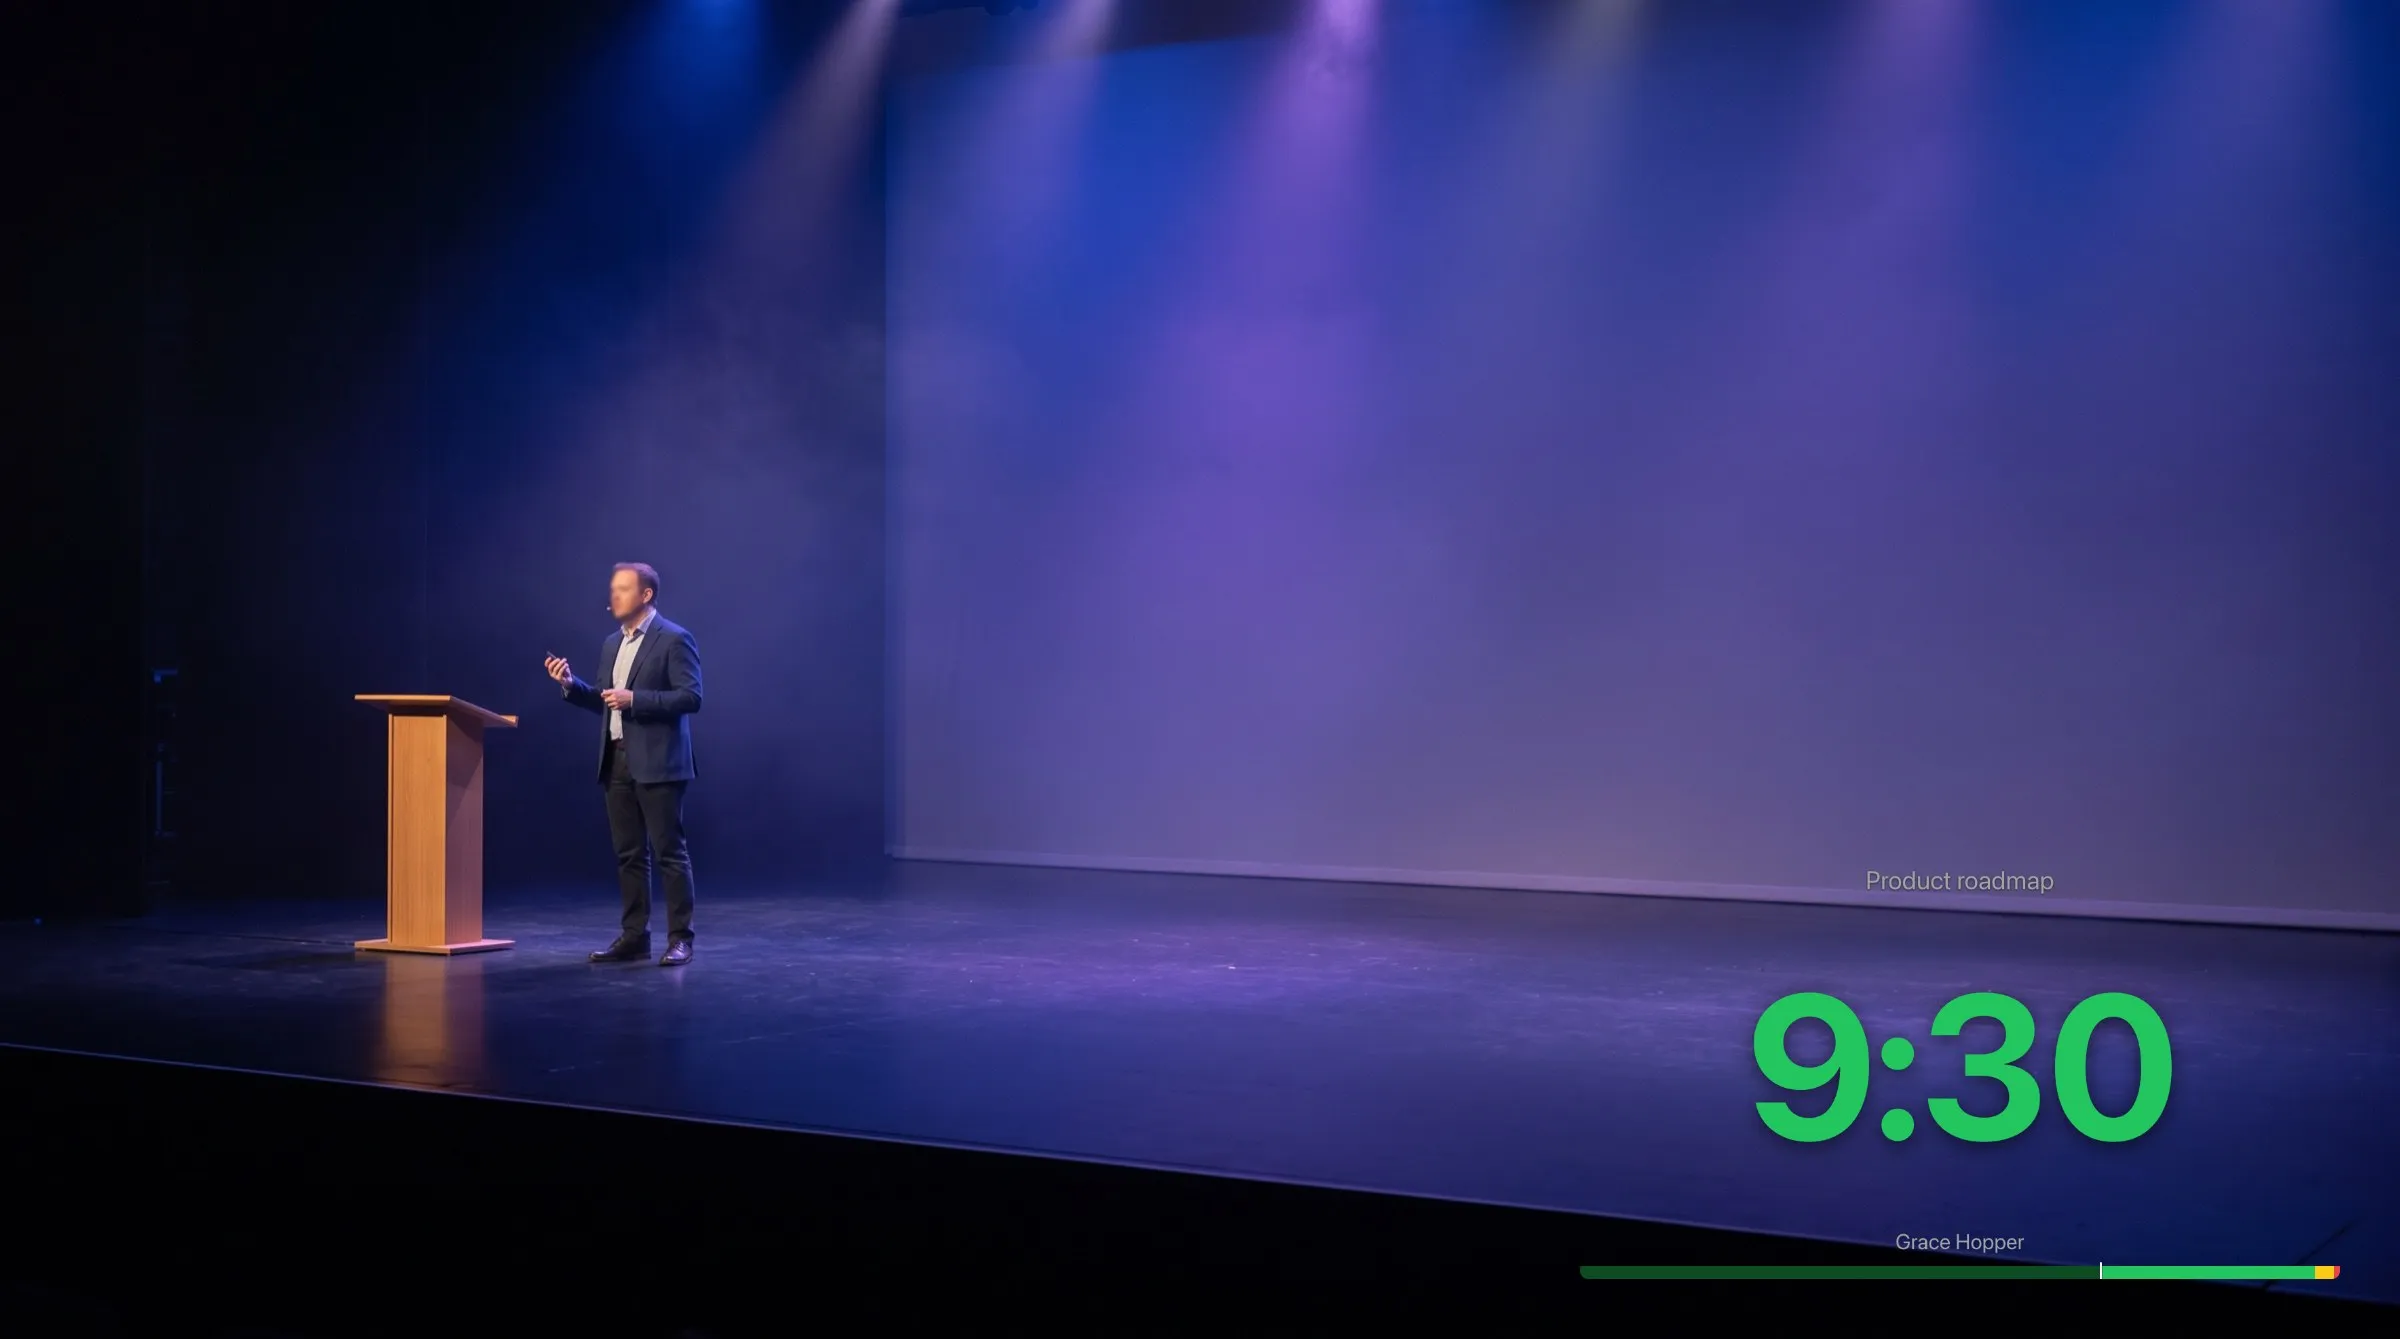
What you need
- OBS Studio on Windows or a Mac. Its Browser source comes with it. The screenshots here are from OBS Studio 33 on a Mac: on Windows, the names this guide uses, such as Browser, Add a new Browser, Blending Mode, and Filters, are the same, but the capture sources in the pictures have the Mac’s names.
- A room in CueStride with the timers of your show. Any plan can show the Timer in OBS; the transparent link is part of Pro and up.
- A scene in OBS with your video in it: a camera, a capture card, or a media source.
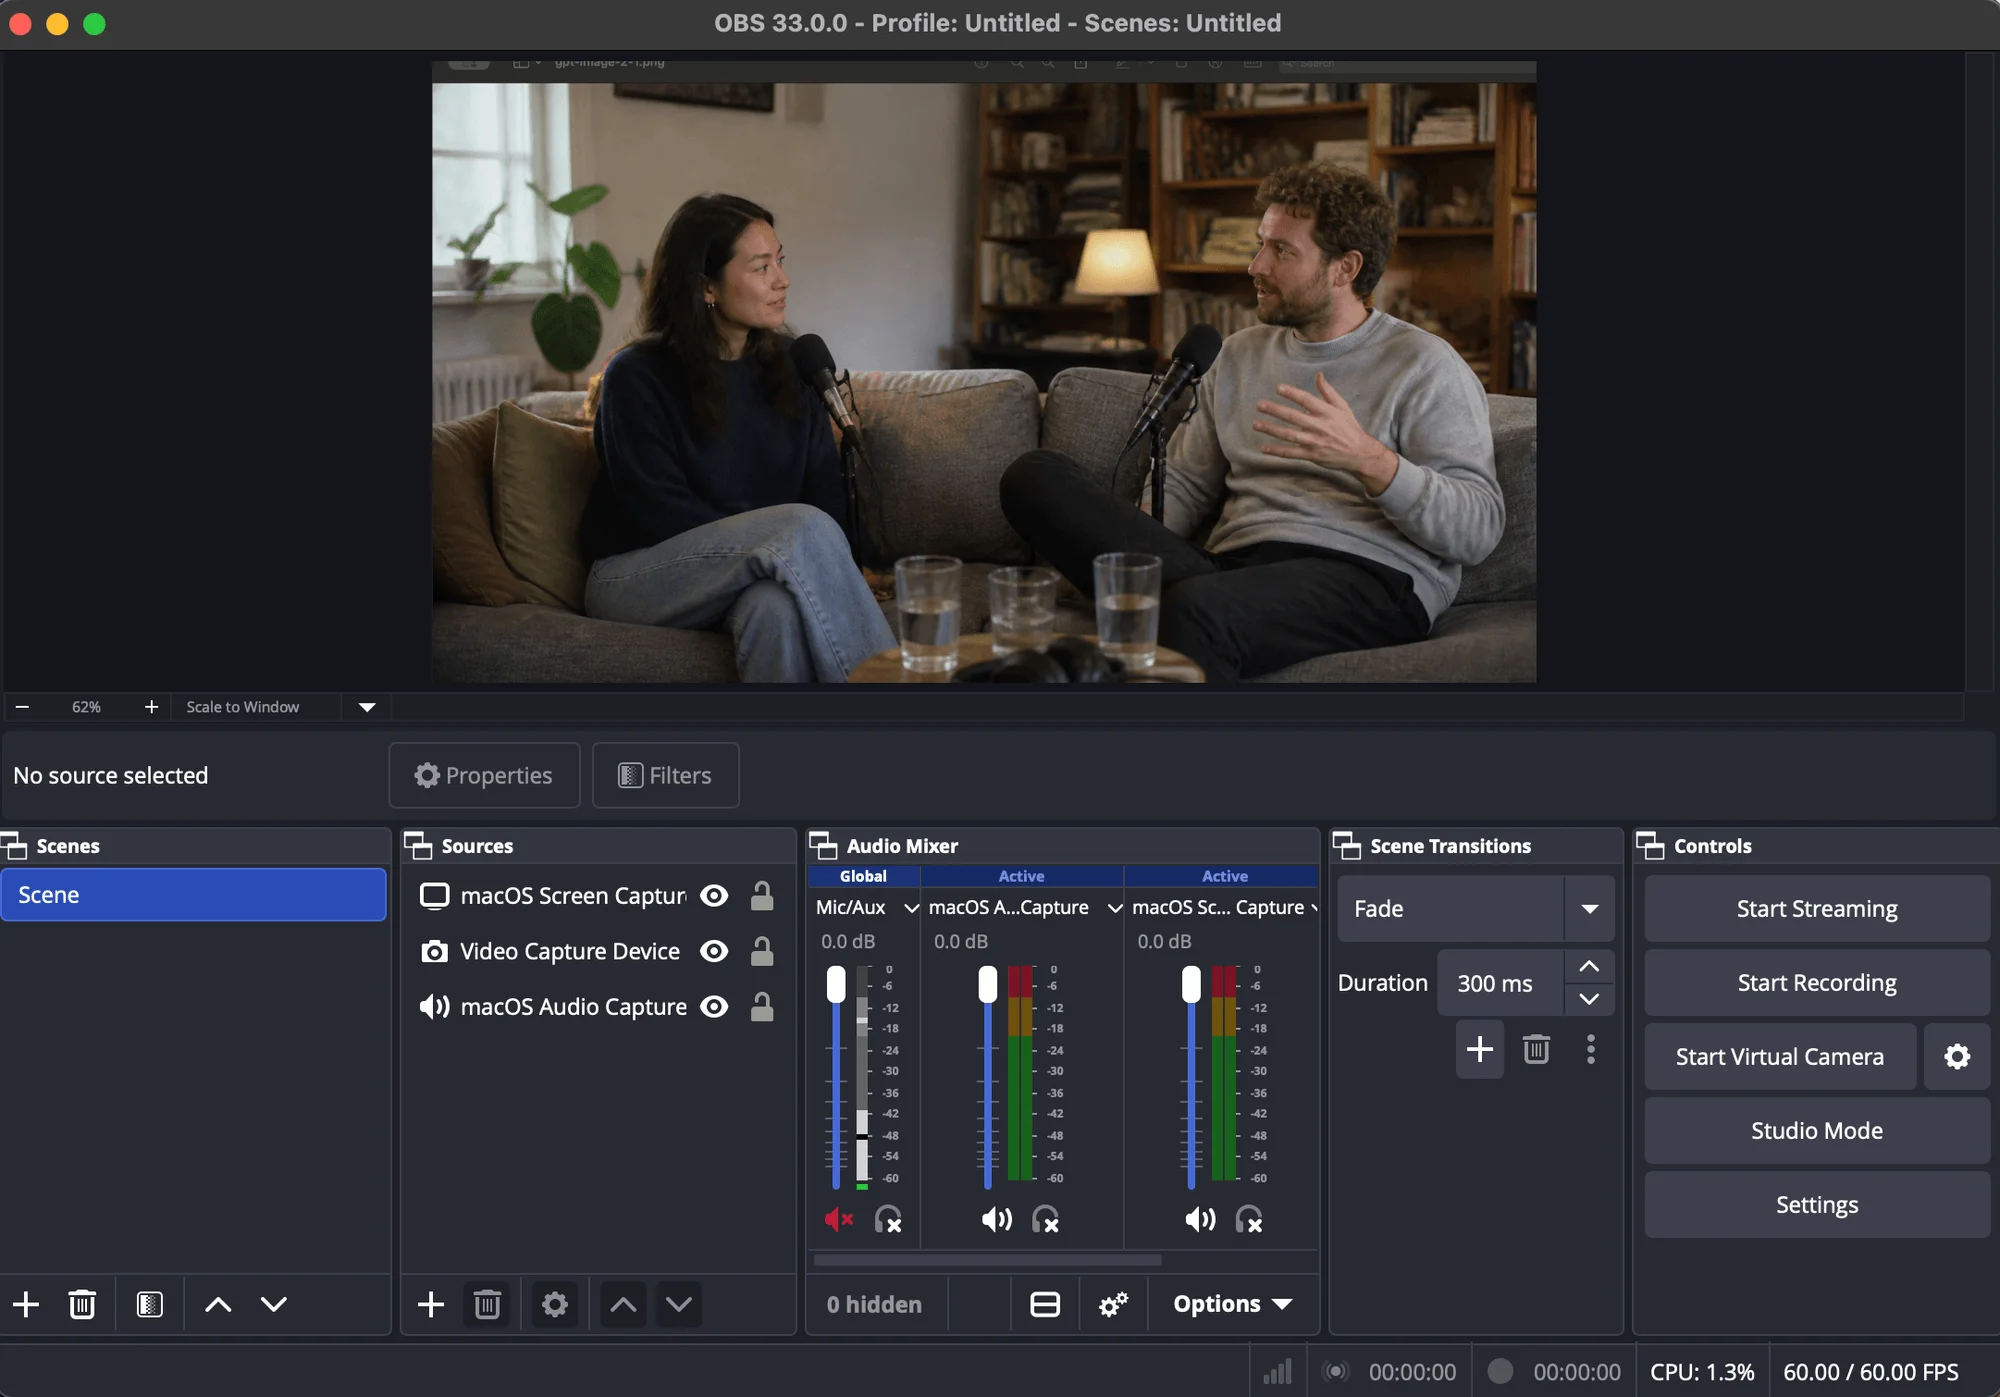
Add the Timer to a scene
Step 1: Copy the Timer’s link
- In CueStride, open the room’s controller and choose Links. It opens Share a screen.
- Choose the Timer card. Under Options, tick what this source needs: Transparent background for option 3 below, or Hide the screen’s controls for options 1 and 2.
- Choose Copy beside the link.

Step 2: Add a Browser source
- In OBS, pick the scene in the Scenes panel.
- At the foot of the Sources panel, choose +. The Add Source window opens.
- Choose Browser in the list, leave Make source visible ticked, and choose Add a new Browser.
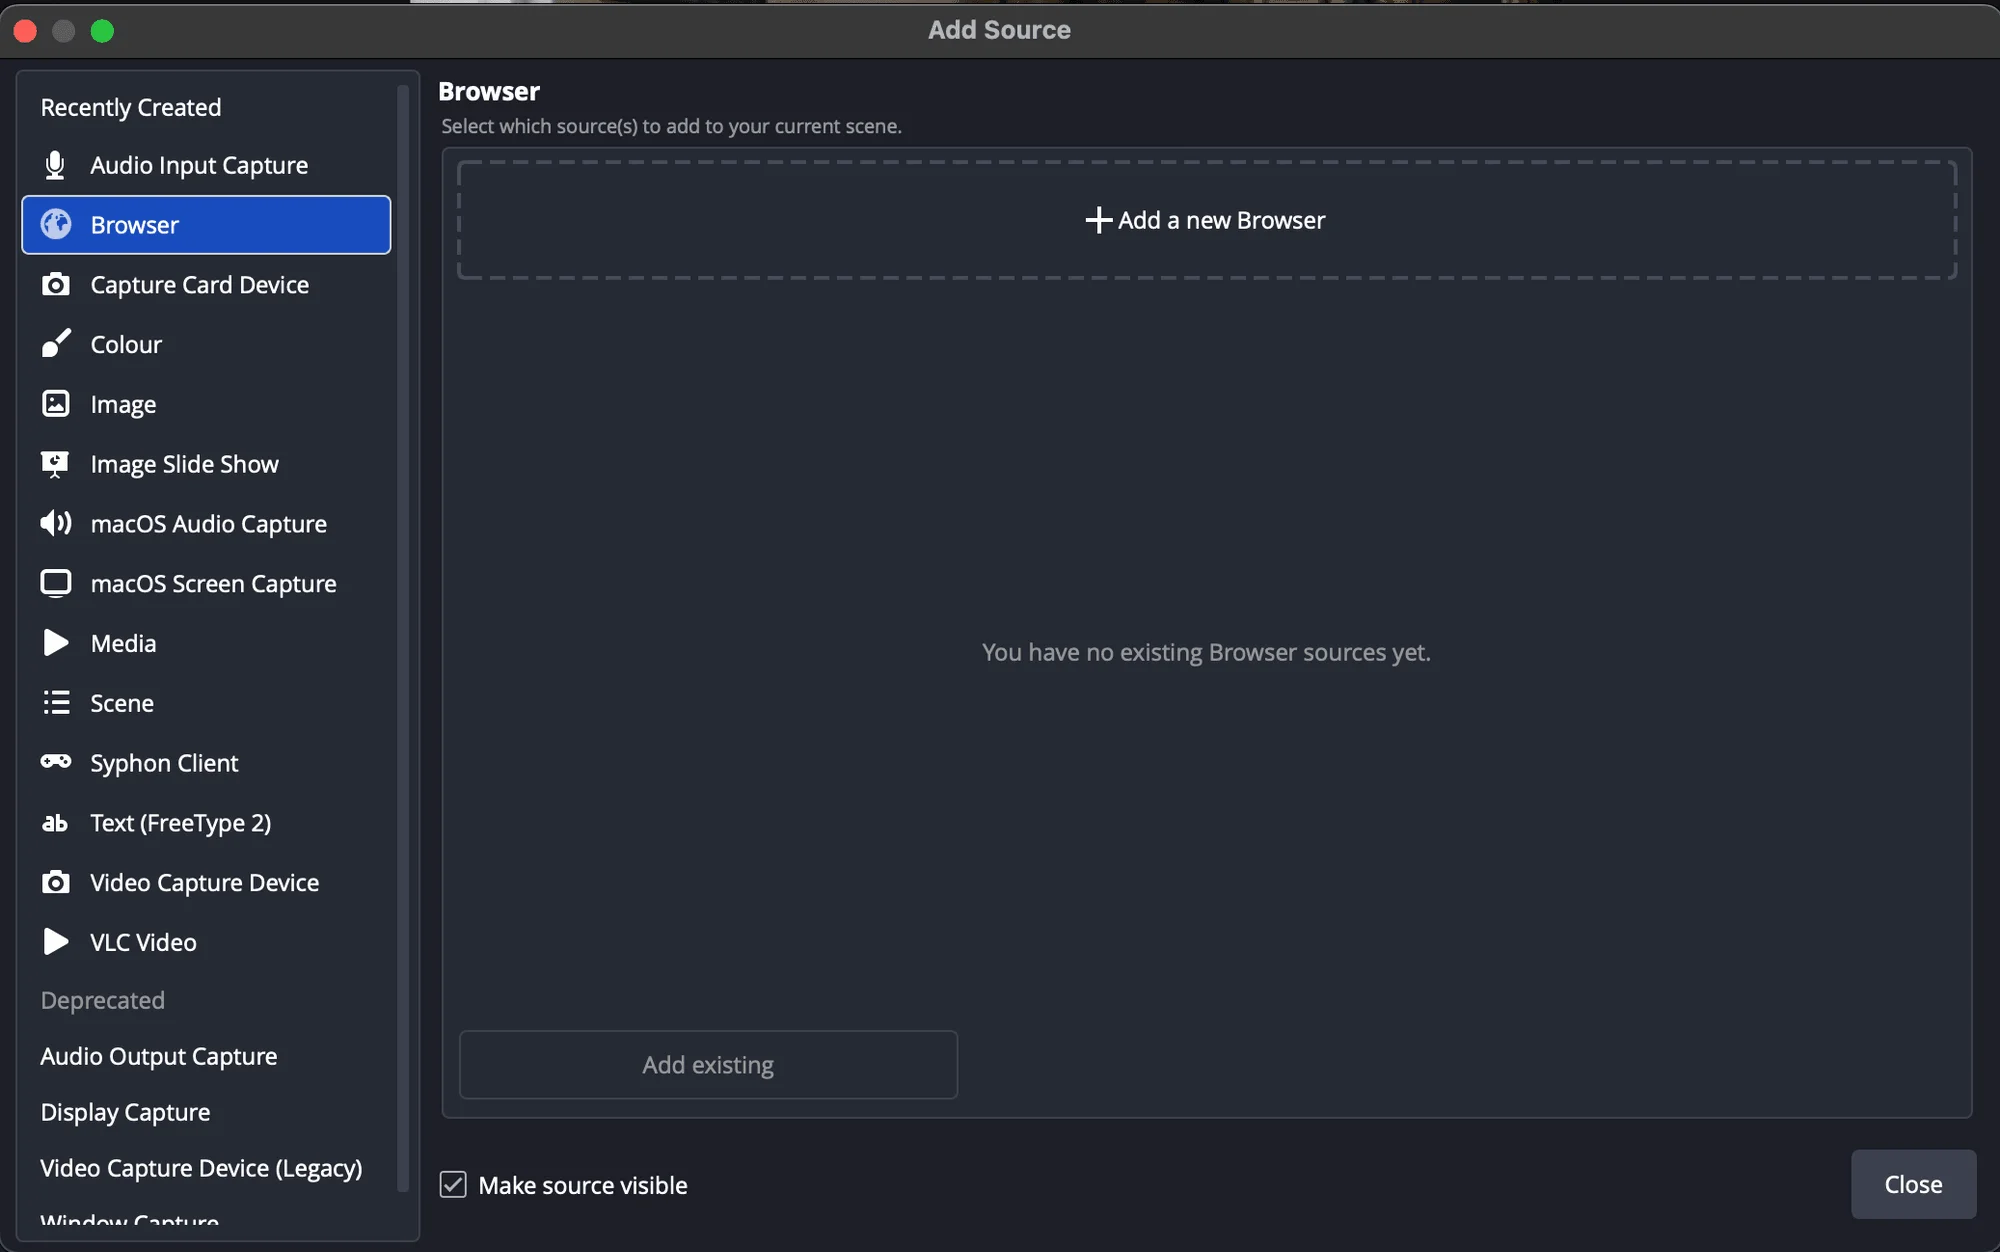
OBS adds a source called Browser to the scene. If its Properties window does not open by itself, double-click the source in Sources. To give it a clearer name, right-click it, choose Rename, and type, for example, “CueStride timer”.
Step 3: Paste the link and set the size
The source’s Properties window opens.
- In URL, replace the address OBS put there with the Timer’s link.
- Set Width to 1280 and Height to 720, for a 16:9 picture.
- Leave the other settings as they are, including those further down the window:
- Shutdown source when not visible off, so the Timer stays connected while another scene is on air and is ready when you switch back.
- Refresh browser when scene becomes active off, so the Timer does not reload on every cut.
- Custom CSS as OBS fills it in. The Timer draws its own background, and the transparent link removes it.
- Choose OK. The window’s own preview shows the Timer once the link loads.
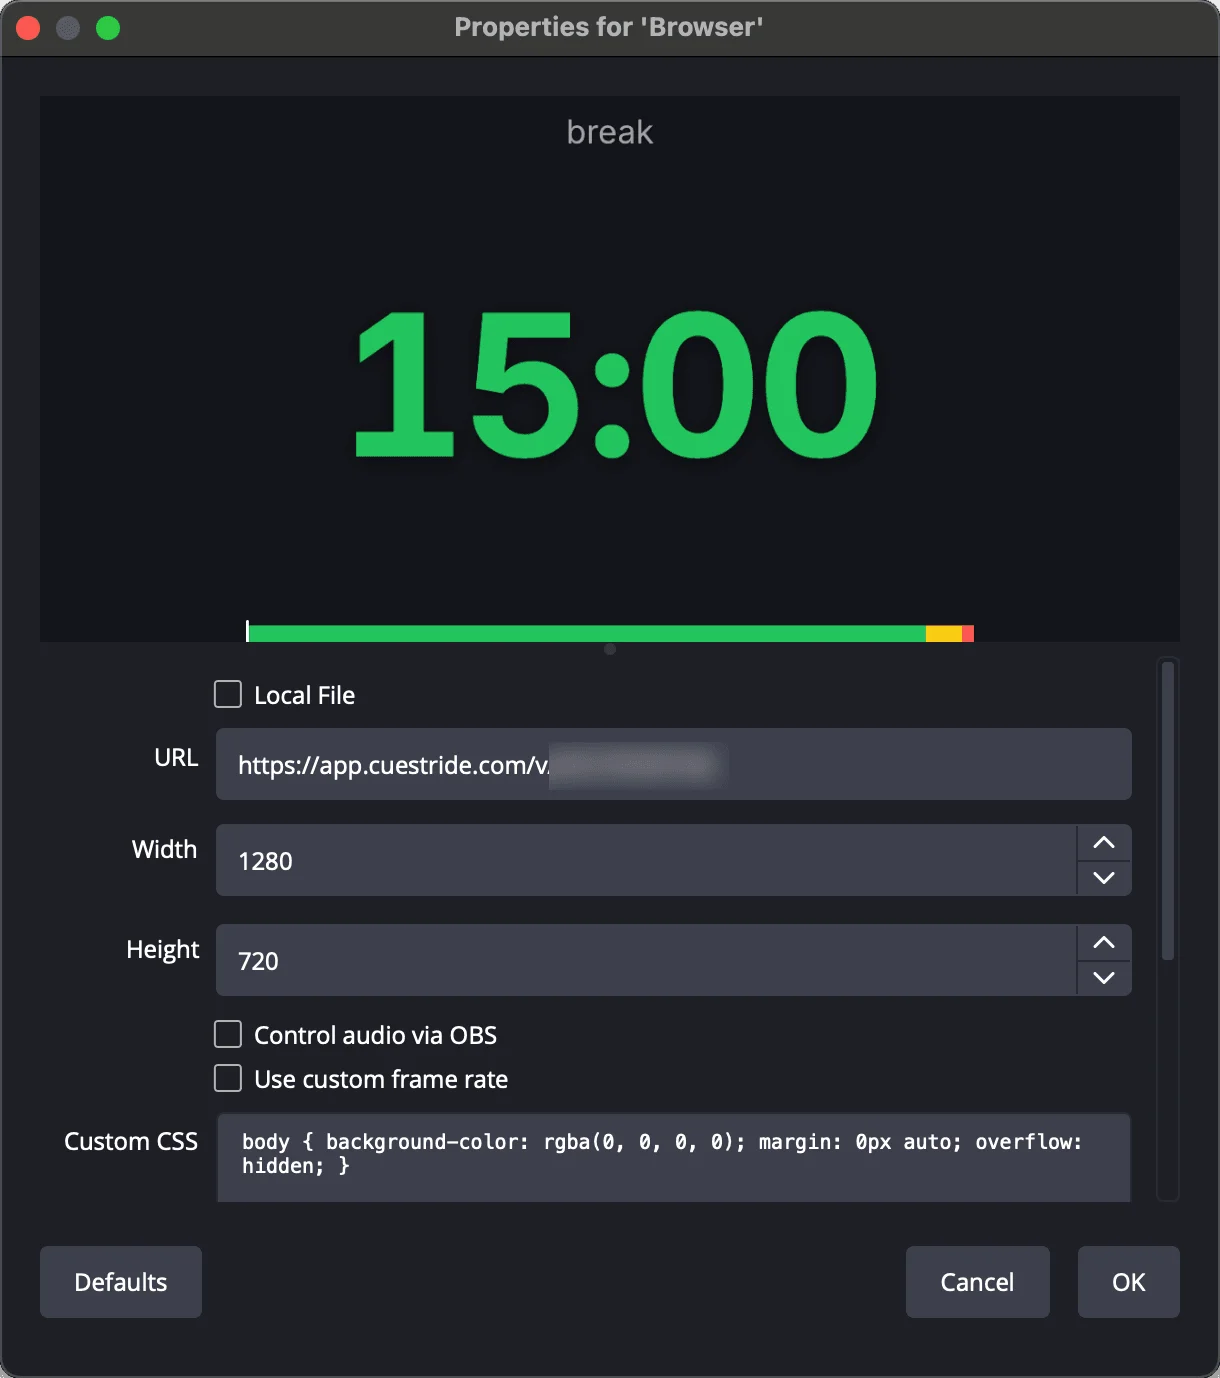
The Timer fills whatever size you give it. 1280 by 720 is a good start; for a wide, short strip, such as a lower third, try 1280 by 360. The source needs no account to show, and it counts as one of the room’s screens, like any other open Timer.
Step 4: Place it over your video
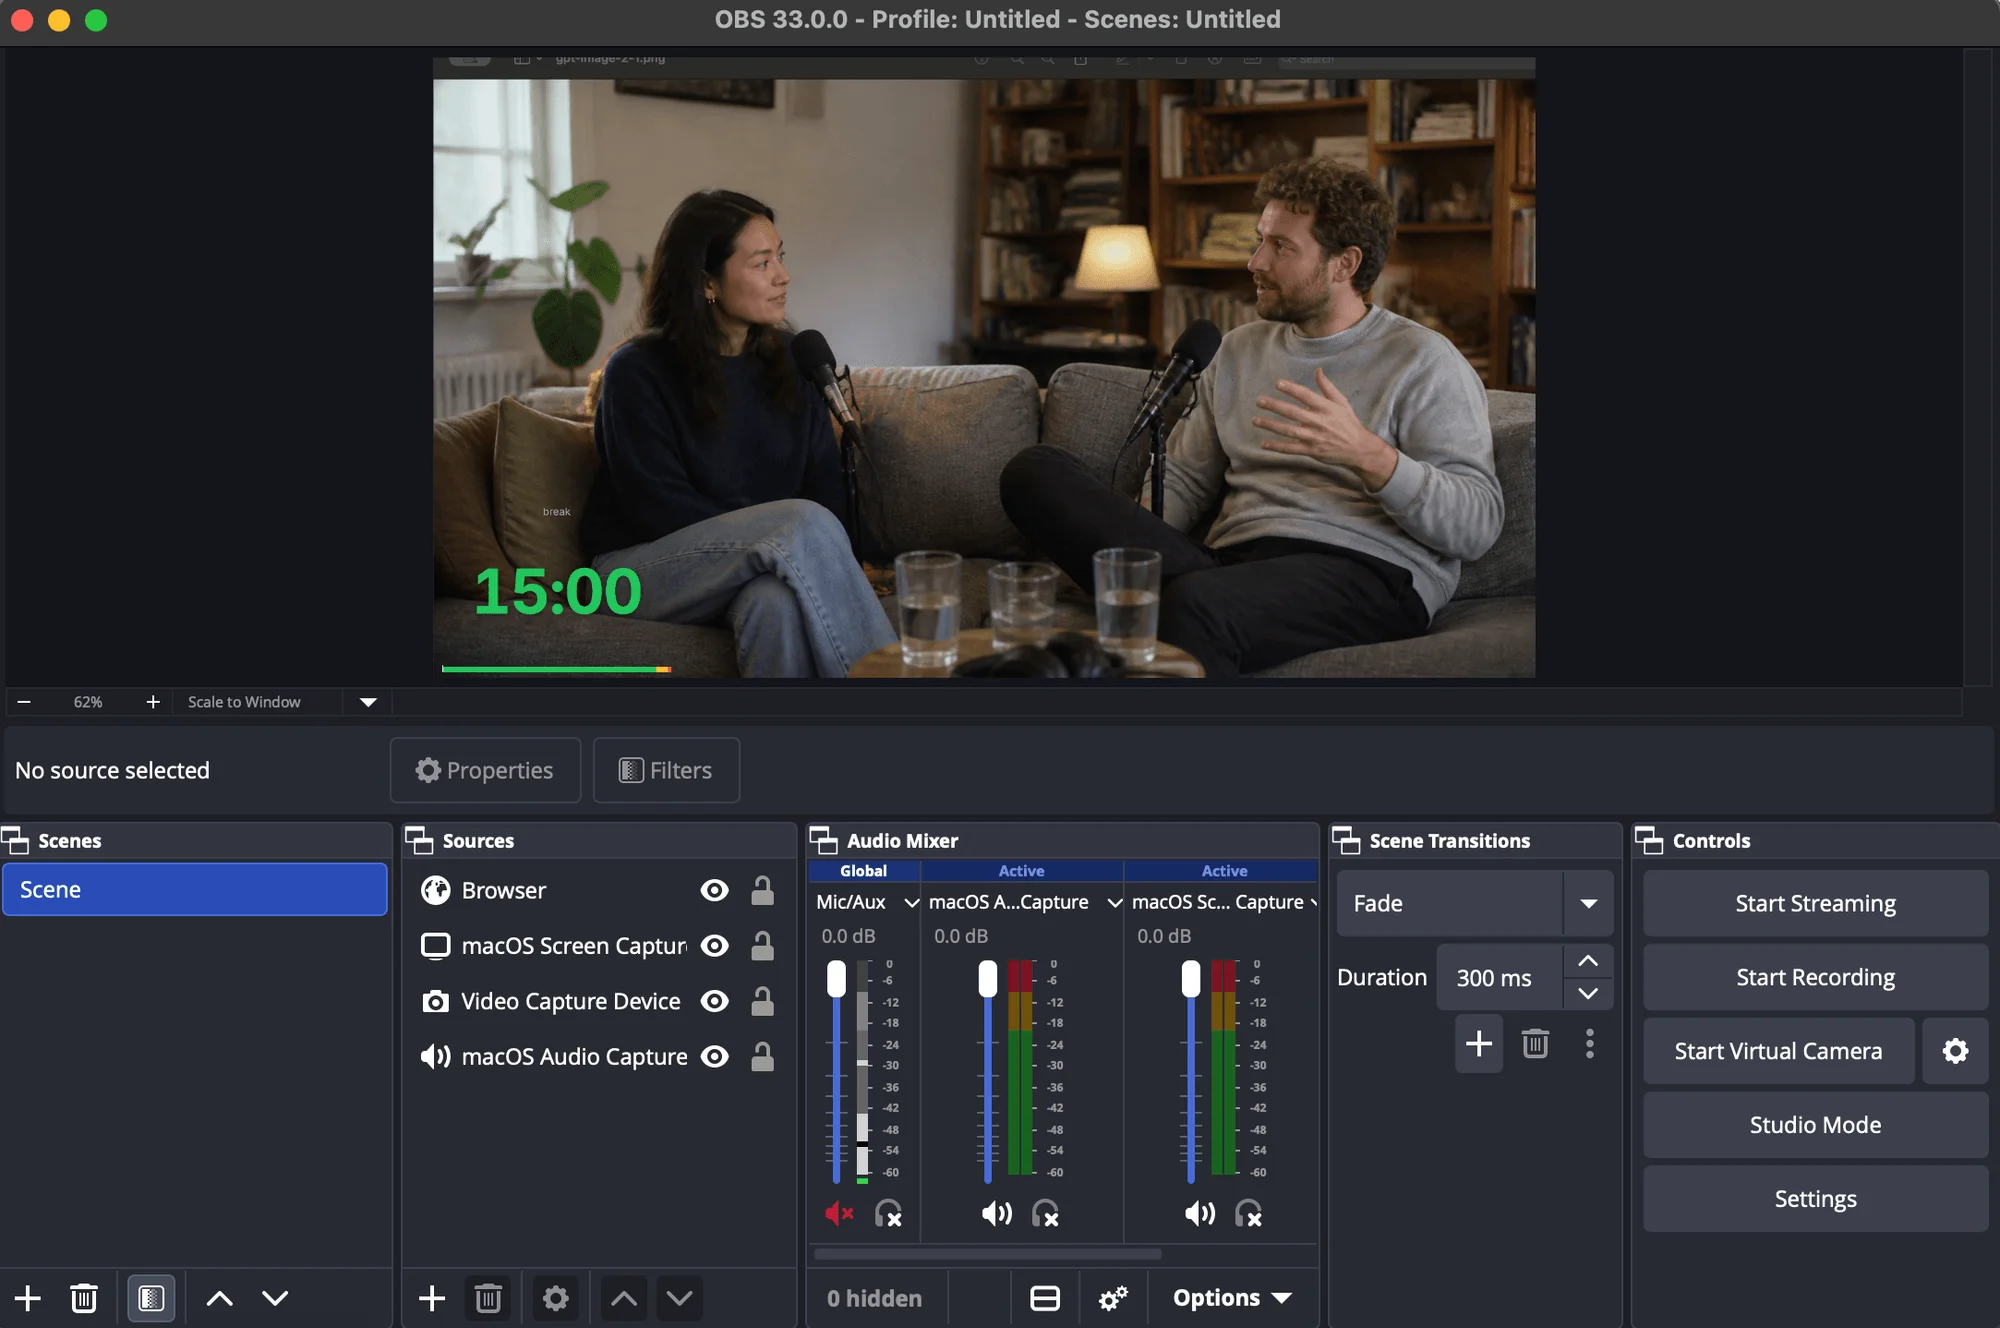
The source appears over your video, at the top of the scene’s Sources list. Choose it to select it: red handles surround it in the preview, and Properties, Filters, Interact, and Refresh appear in the bar under the preview.
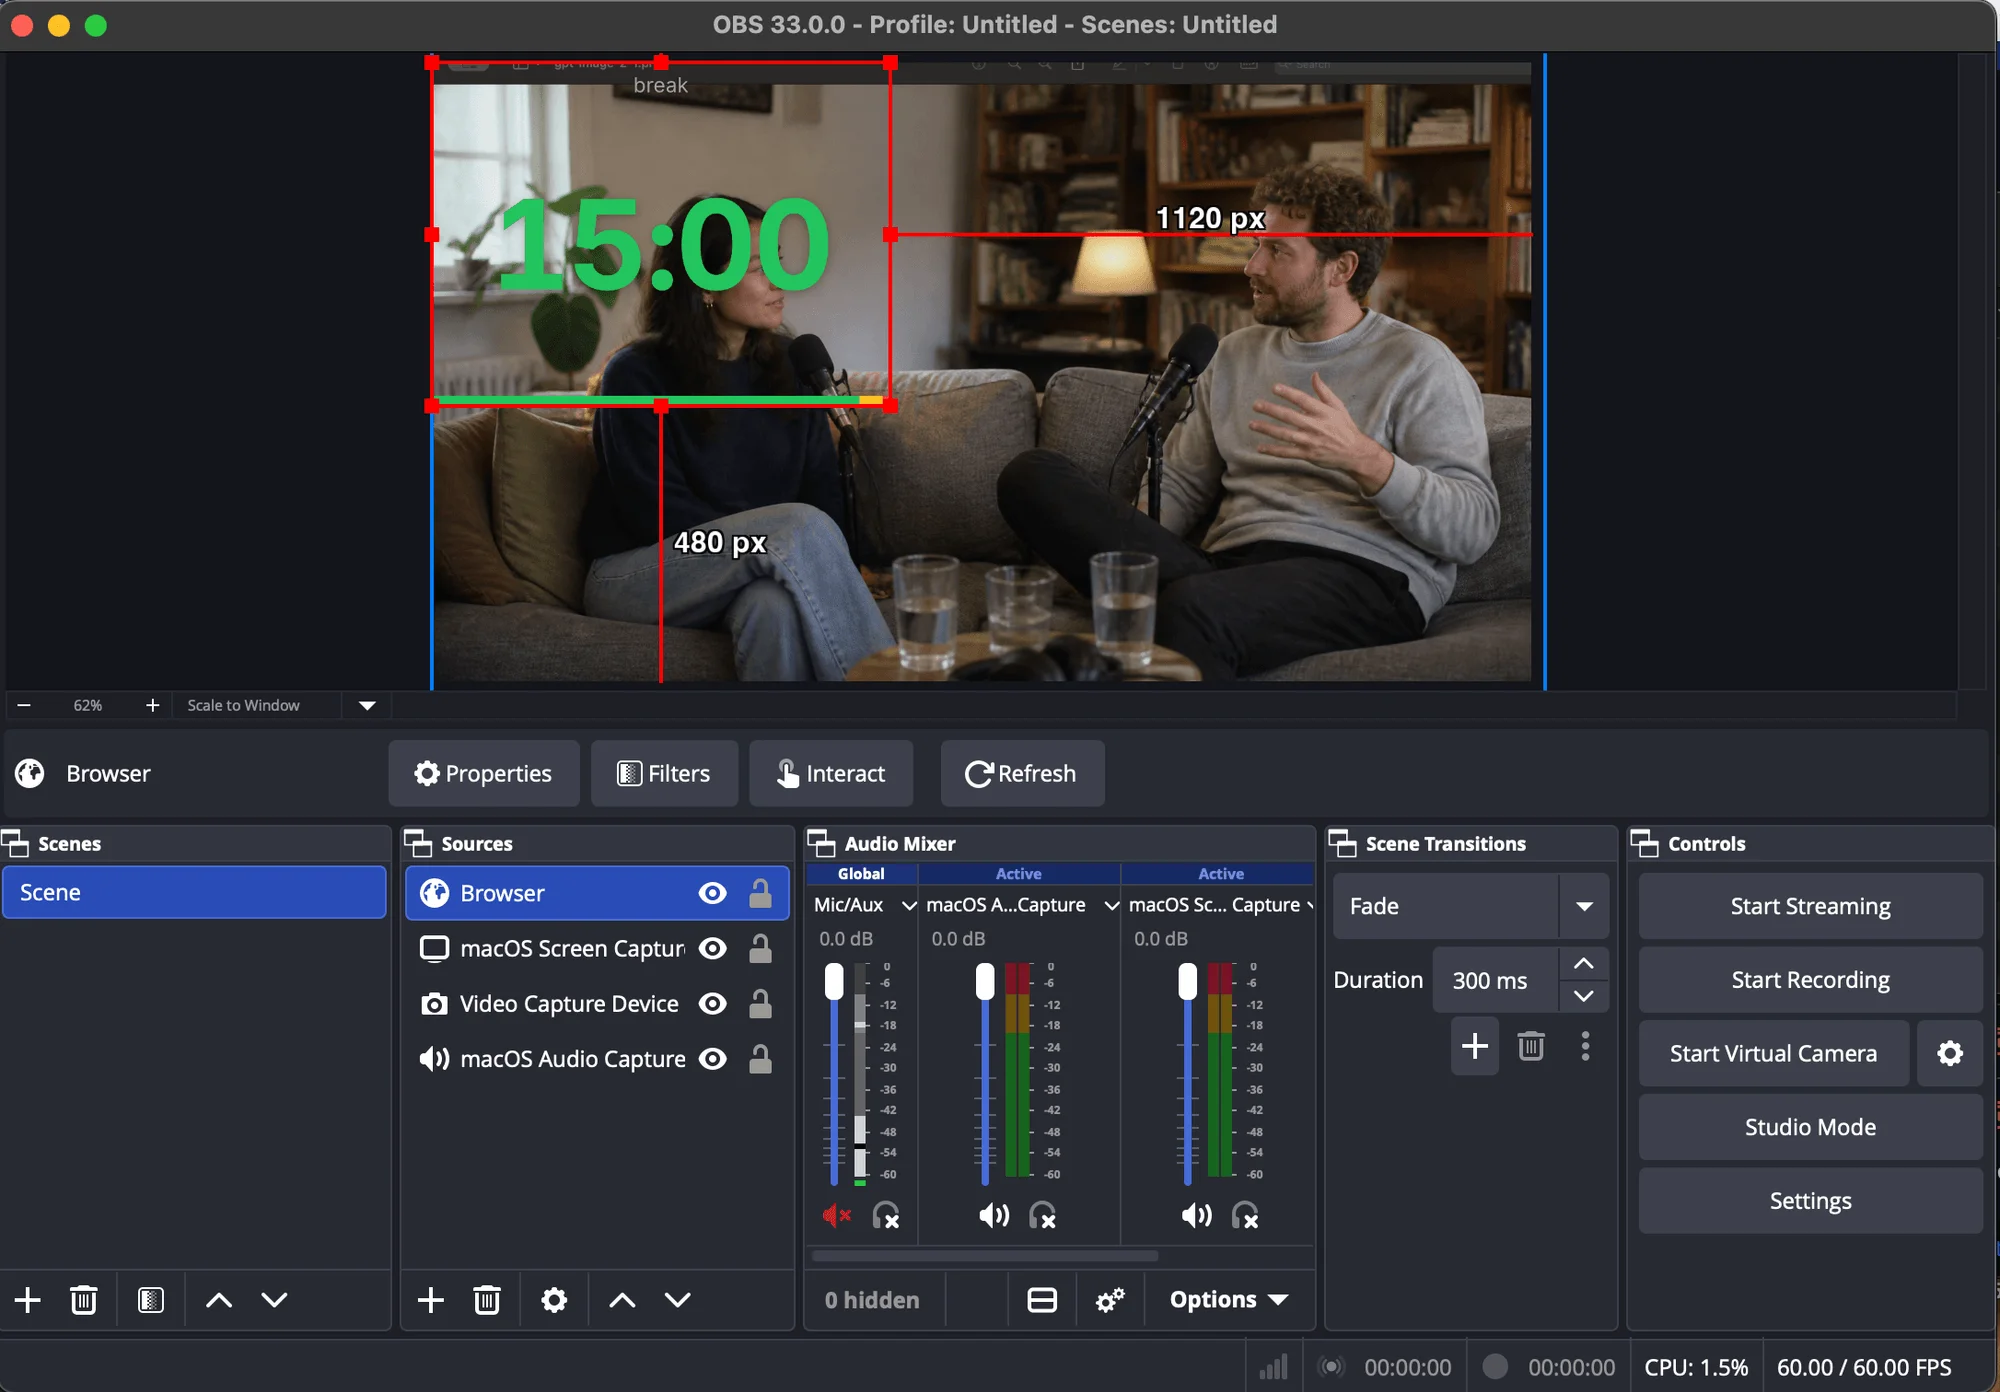
- Drag the source in the preview to move it. Its red handles scale the picture, which softens the digits: for the sharpest Timer, set Width and Height in Properties to the size you want it on the canvas, and leave the handles alone.
- To place it exactly, right-click it and choose Transform, then Edit Transform.
- To show only part of it, such as the digits without the timer’s name, hold Alt (Option on a Mac) and drag an edge to crop it.
- Once it is where you want it, choose the padlock beside the source in Sources, so a click in the preview cannot move it during the show.
Remove the black background
The Timer draws its digits on black. You can take the black away in OBS, on every plan, or ask CueStride for a Timer with no background at all.
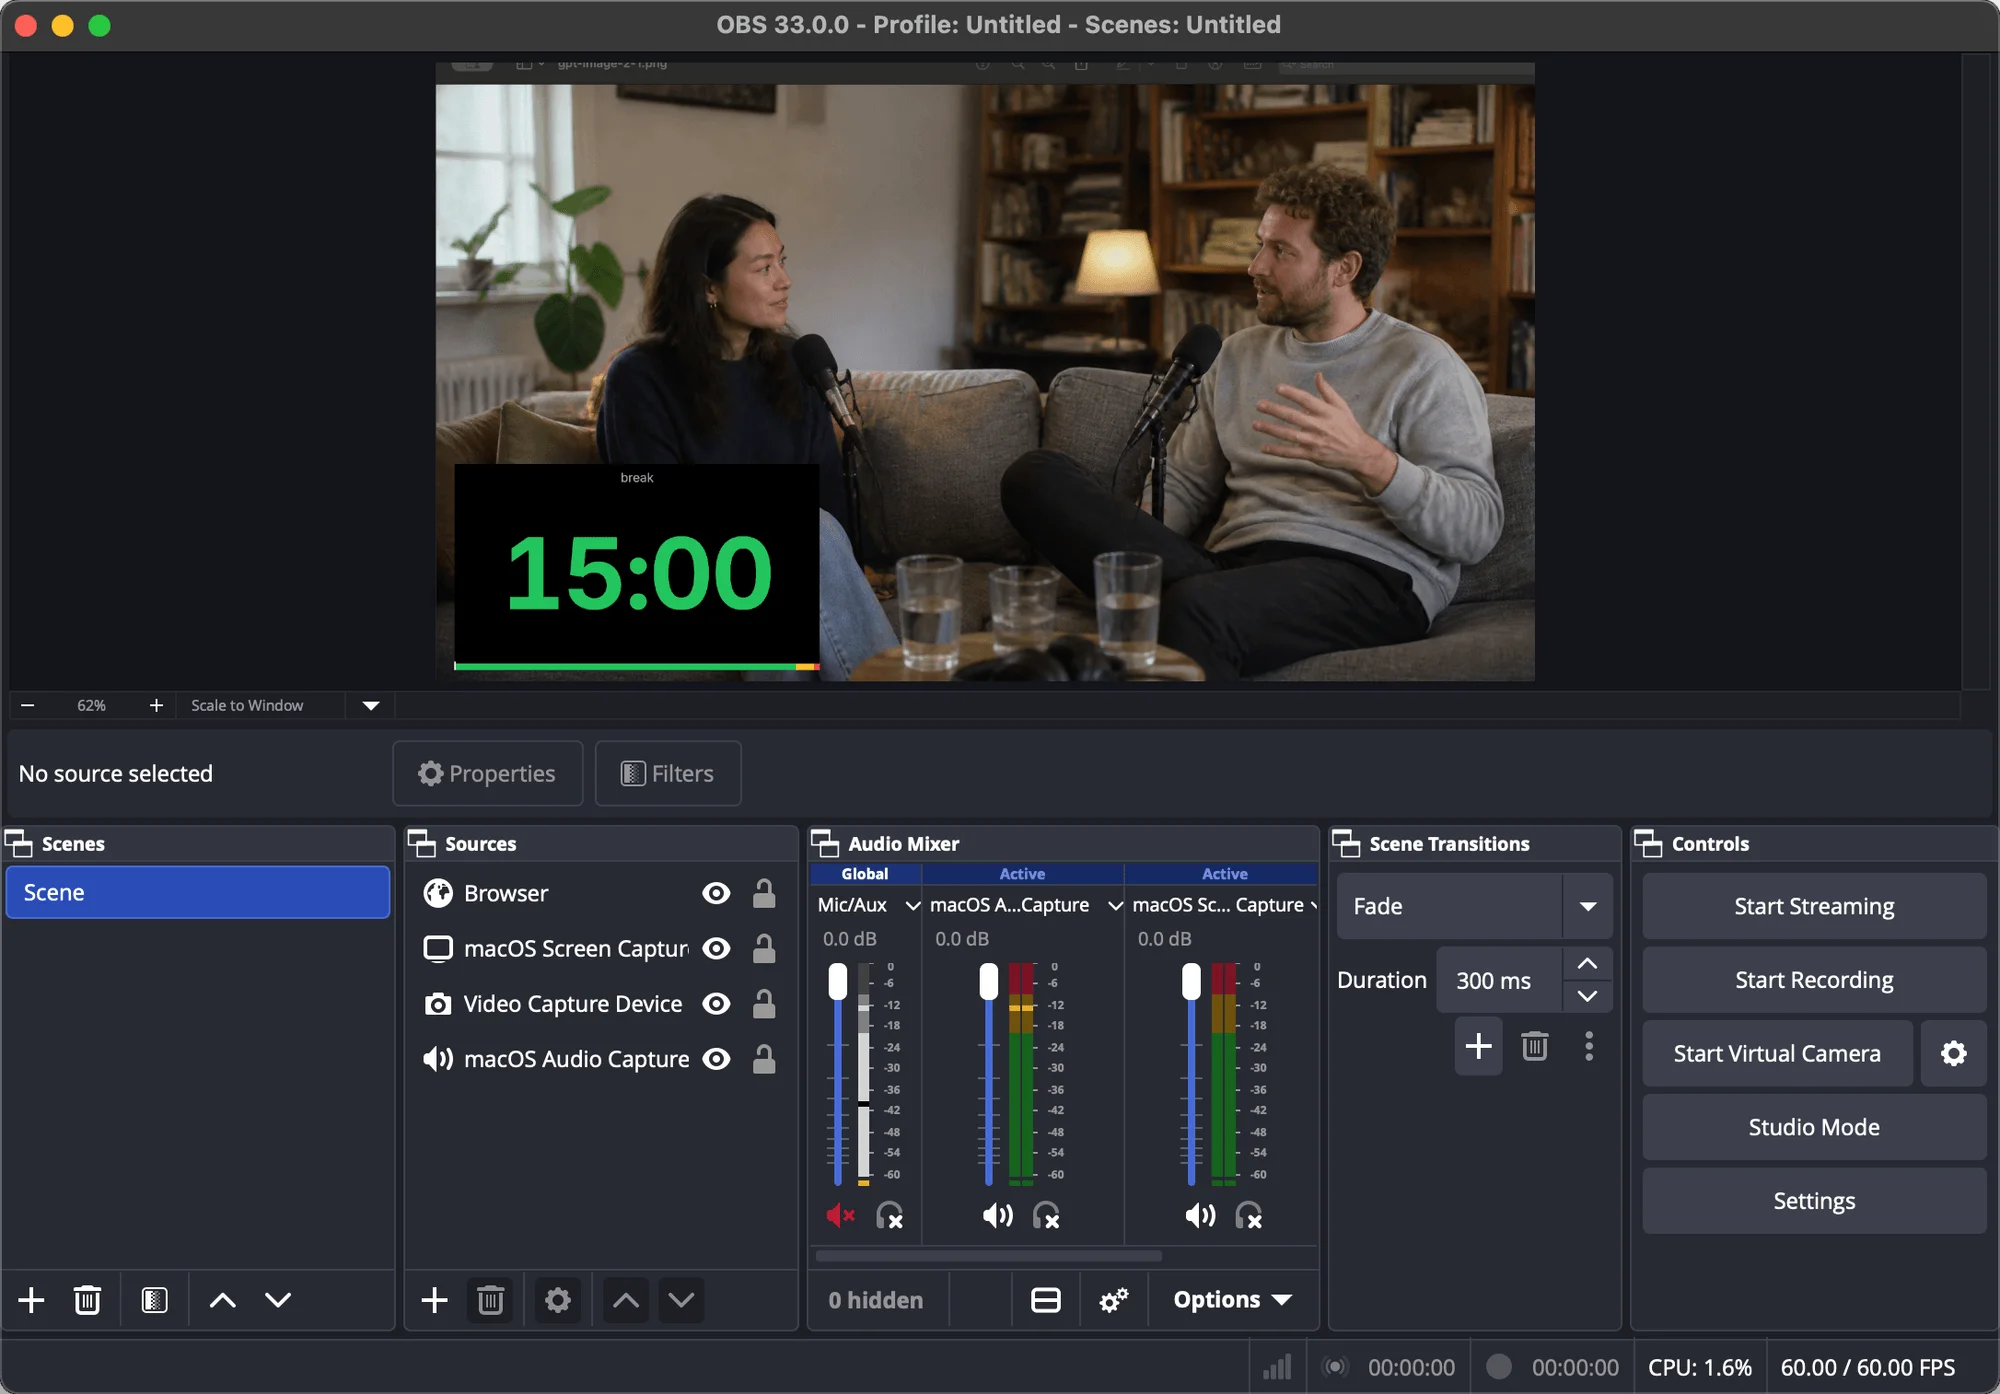
Option 1: The Add blending mode
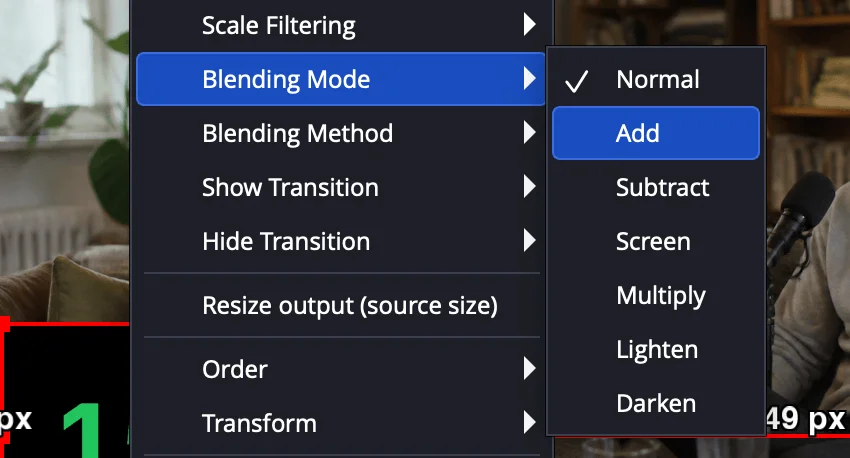
In the Sources panel, right-click the source, choose Blending Mode, then Add.
OBS adds the Timer’s light to the video under it, so black disappears and white stays white. Every colour turns partly see-through, the darker ones more: the green, yellow, and red digits and the progress bar let the video show through them. It suits a dark video; over a bright one, try the next way.
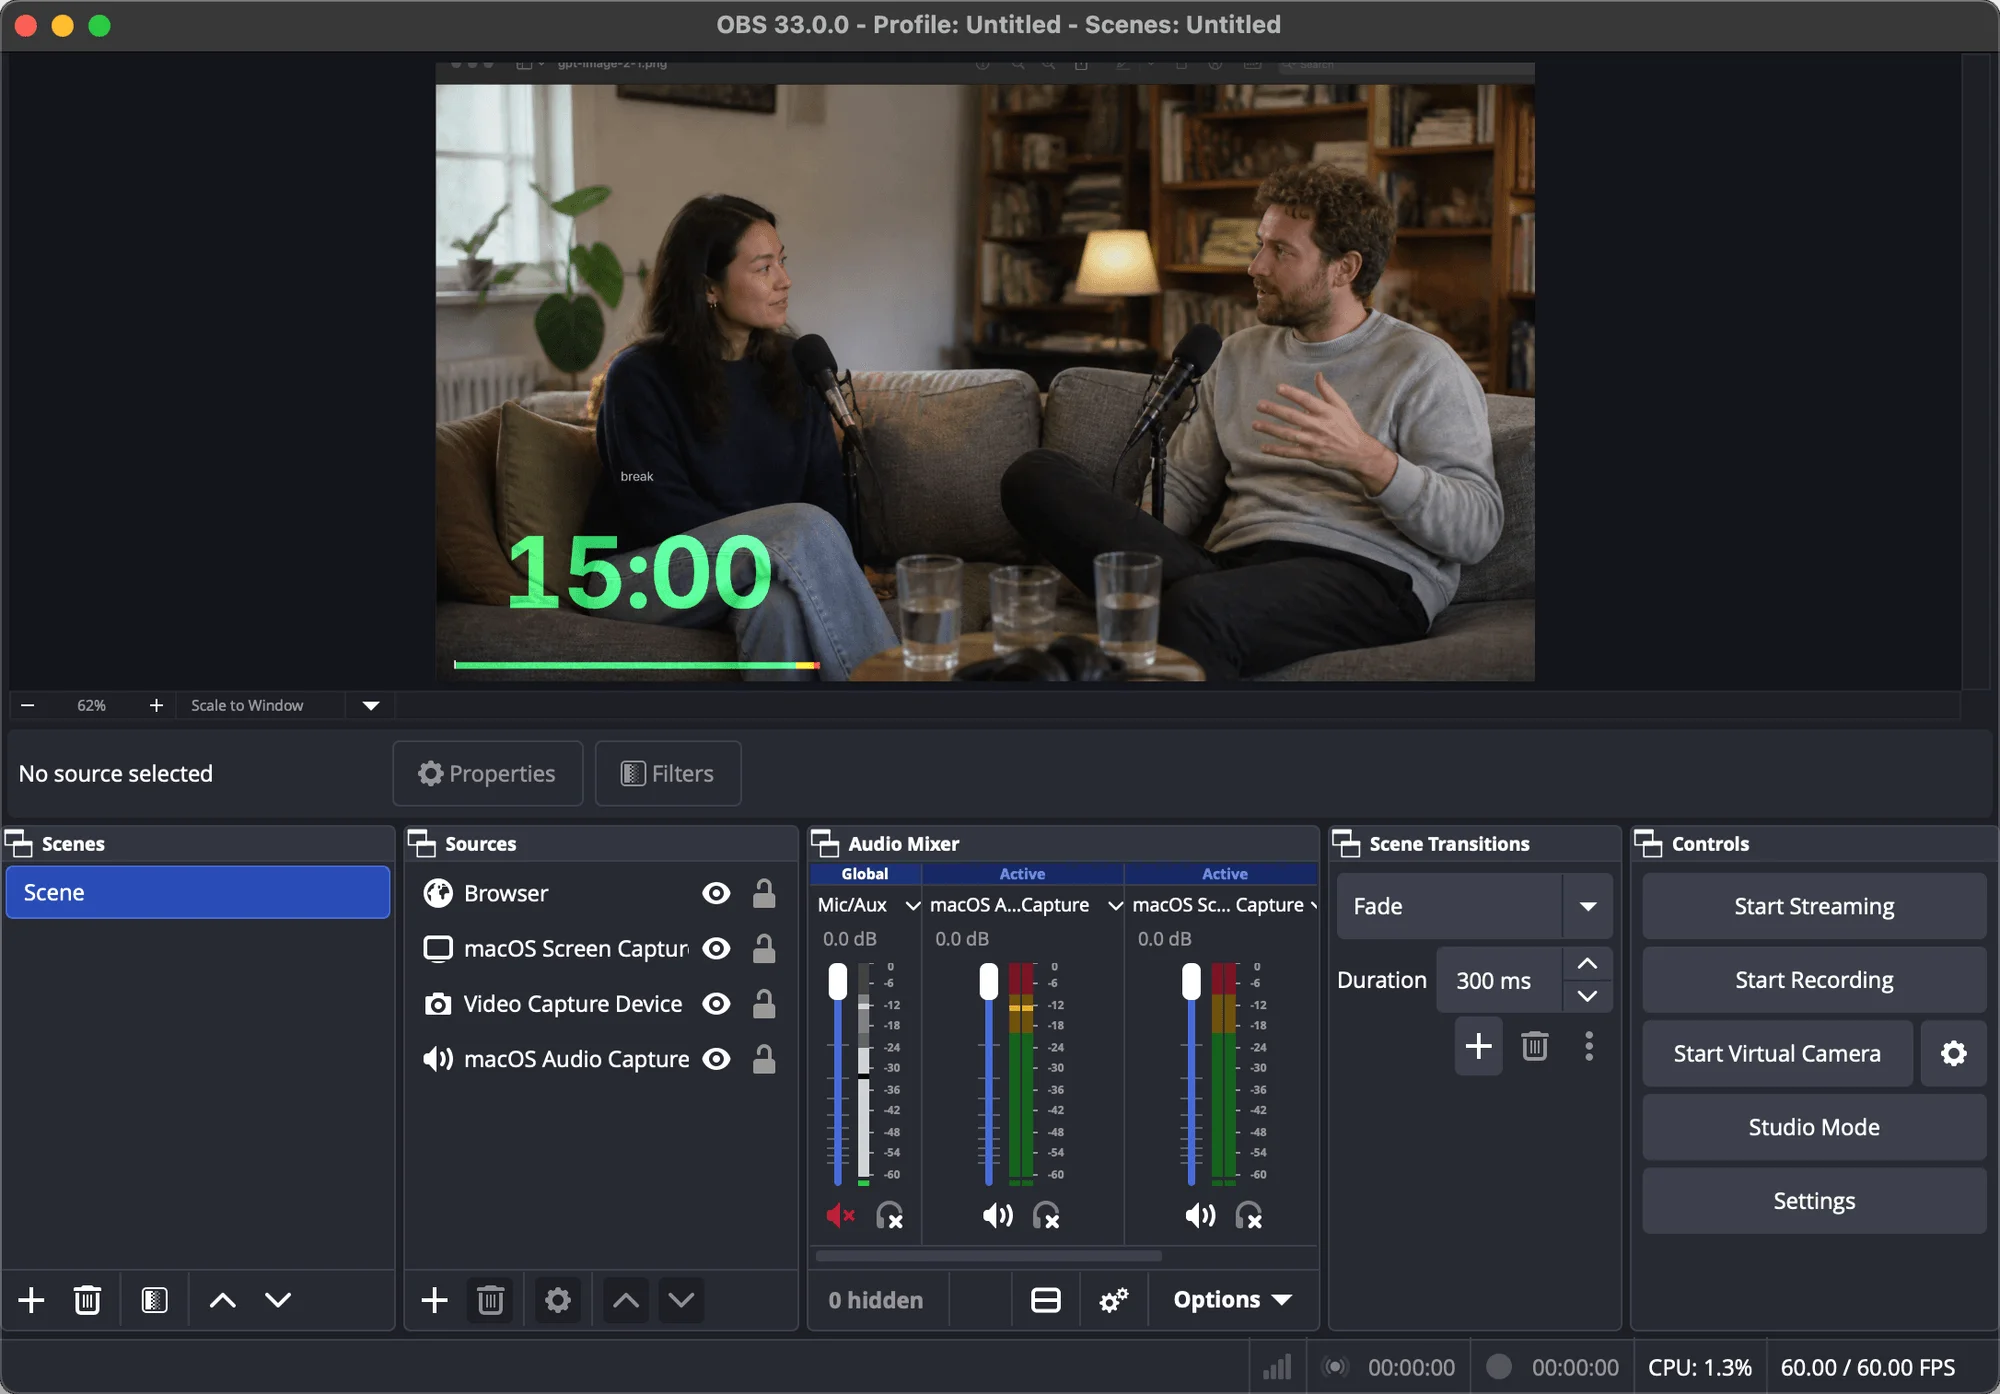
Option 2: A color key filter
- Right-click the source and choose Filters.
- Under Effect Filters, choose + and Color Key, then OK.
- Change Key Color Type from Green to its custom option. A Key Color swatch appears:
set it to black,
#000000, the Timer’s background. - A new filter starts with Similarity at 400, which takes more than the black. Lower it until only the background goes, then raise Smoothness a little if the digits’ edges look hard.
- Close the window. The filter stays on the source.
The colours stay solid, but the edges of the digits can fray, and anything dark in the Timer goes with the black, such as the track the progress bar runs in.
Option 3: A transparent Timer
Pro and upCueStride can draw the Timer with no background, so OBS needs no blend mode and no filter. The digits, the progress bar, the message, and your logo are drawn as they are on stage, and the rest of the page is clear.
- In Share a screen, choose the Timer card.
- Under Options, tick Transparent background. The Timer’s picture on that page turns to
the checks image editors use for no background, as in the Share a screen picture in Step 1,
and the link gains
background=transparent. - Copy the link. In OBS, double-click the source to open its Properties, paste the link into URL, and choose OK.
A source already in OBS needs no new link: in the controller, open Live connections from the screen count beside Connected, and on the source’s row choose Transparent background, the button after the two flips. The source goes clear at once, and stays clear when you refresh it. Choose the button again to bring the black back.

The button changes the open page, not the URL saved in the source. When OBS loads that URL again, for example after a restart or when Shutdown source when not visible is on and the source is hidden and shown, the Timer comes back as the link you pasted. To keep it clear for good, paste the transparent link into the source’s URL.
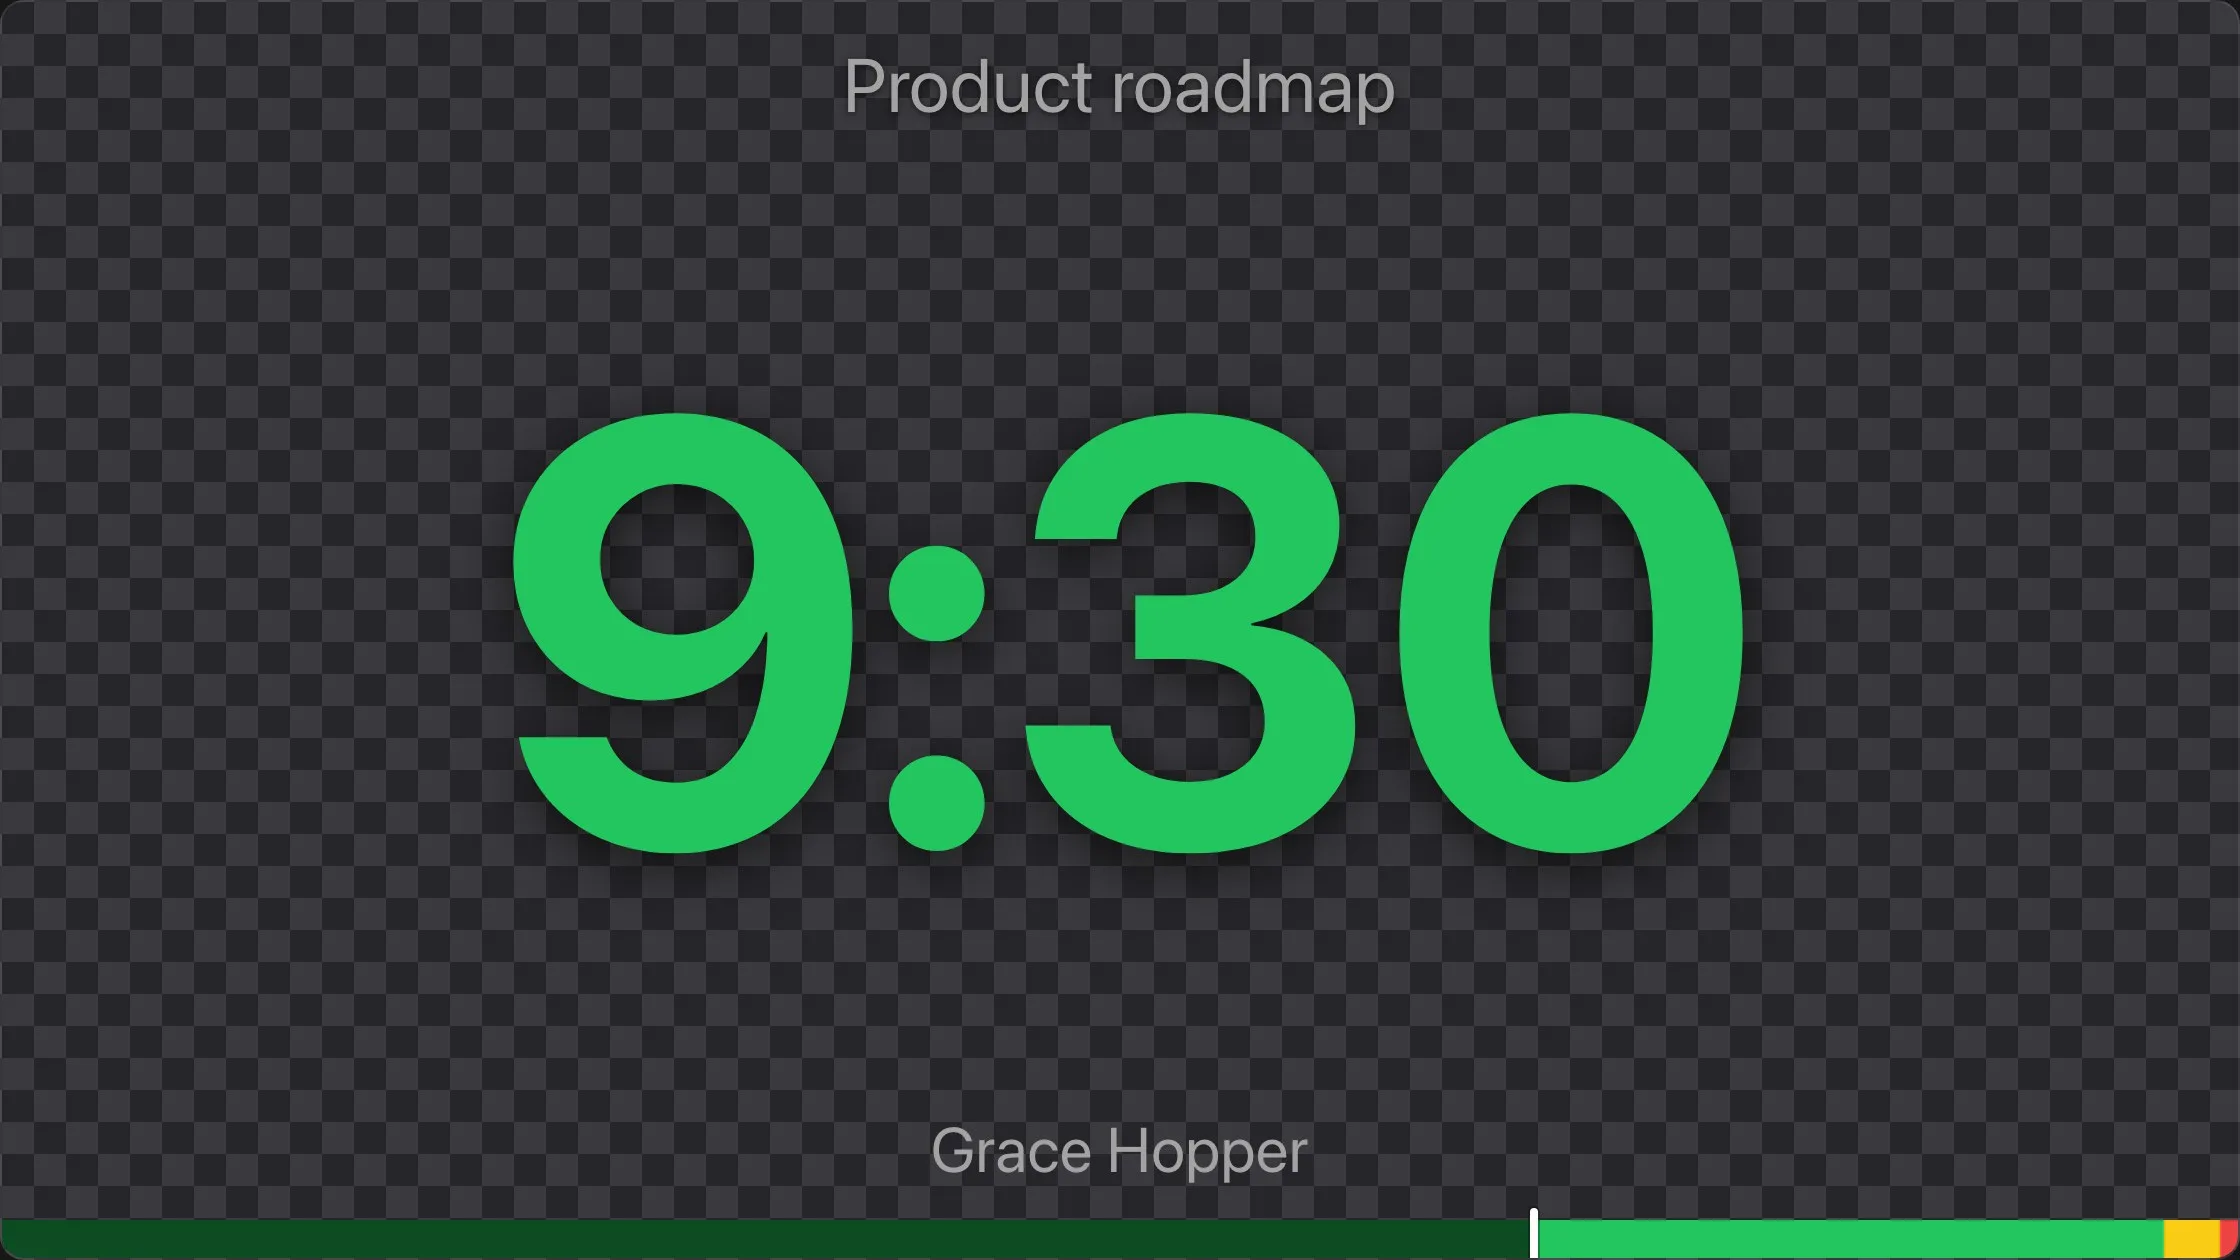
What the transparent Timer does:
- It draws nothing over the Timer: no corner buttons, so you need not tick Hide the screen’s controls, no Enable sound button, and no request to go fullscreen. Its chimes stay silent.
- The text and the message carry a soft shadow, and the progress bar’s track is see-through, so they stay readable over a bright picture.
- Blackout leaves nothing drawn: the source goes clear until you turn blackout off.
- Mirror horizontally and Flip vertically still apply, if you tick them too.
- Opened in a browser tab, the page looks black: a tab has nothing behind the page, so it shows its own dark background where OBS shows your video.
Transparent background is part of Pro and up. On Starter, the
option is shown greyed out, marked as part of Pro, and the link never carries
it. A link with background=transparent opened in a room whose account has no such plan shows
the usual black background, still with no corner buttons and no chimes, and so does a
transparent link for the moment before the page has heard from CueStride.
Sound
The transparent Timer never chimes and shows no sound button, so this part is for options 1 and 2.
A Timer plays its chimes only once someone has clicked it, which nobody does in OBS, so the source starts silent. While any timer in the room has a chime, a black Timer shows an Enable sound button until it is clicked, and Hide the screen’s controls does not hide it, so OBS records it. To clear it:
- In the source’s properties, tick Control audio via OBS, so the chimes reach OBS’s Audio Mixer, where you can set their level or mute them, and choose OK.
- Select the source and choose Interact in the bar under the preview, or right-click it and choose Interact, then click Enable sound in the window that opens. Close the window.
The source remembers the choice, so the button does not come back. After OBS reloads the source, the chimes wait for one more click: open Interact and click anywhere in it.
Before you go live
- Start a timer in the controller and watch it count in OBS’s preview.
- Send a message, see it on the source, and clear it.
- Black out the screens once. With the Add blending mode, the Color Key, or the transparent link, the whole source goes clear while the blackout lasts, so only your video shows; a Timer with its black left in place shows black. Turn blackout off, and the Timer is back at once.
- In the controller, open Live connections. The OBS source is listed with the room’s other screens: choose its menu and Rename it “OBS”, so you can tell it apart during the show.
- Select the source and choose Refresh in the bar under the preview once: it comes back with the same link and background. If you turned sound on, the chimes wait for one more click in Interact, as Sound says.
When something looks wrong
- The source is blank or white. The link did not load: open the source’s properties and check
the URL is the whole Timer link, starting with
https://. OBS needs an internet connection to reach CueStride. - A black box stays around a transparent link. The room’s account is on a plan without the
transparent Timer, or the link lost
background=transparentwhen you pasted it. - The corner buttons show for a moment. Tick Hide the screen’s controls, or use the transparent link, and paste the new link.
- An Enable sound button stays on the source. A timer in the room has a chime: click the button through Interact, as Sound above says, or use the transparent link.
- The Timer was clear and is black again. OBS loaded the source’s saved URL after a restart or with Shutdown source when not visible on. Paste the transparent link into URL.
- The digits look soft. The source is drawn smaller or larger than its size. Set Width and Height to the size it takes in your canvas, rather than scaling it with its handles.
Tips
- One link per use. The Timer on stage and the one in OBS are separate links, so the stage monitor keeps its black background while the stream gets the transparent one.
- Other tools. vMix and other video tools that take a web page as a source use the same link. See Share a screen for the room’s other screens.